Tuesday, March 31, 2020

Who attended my Zoom session? Access a list of participants

Whether you have an attendance policy for your Zoom class or not, it is often useful to know who was present in the meeting, and you don’t always remember to take an account during the meeting itself. Zoom actually creates a list of attendees by default, including data about when each person joined the meeting and how long they stayed.

Here’s how to access the list:

Login to Zoom at zoom.umn.edu
In the main menu on the left of the screen, click on the “Reports” menu item:


Click the “Usage” box:


Select the date range for your session and click the “Search” button:


Click the number in the “Participants” column for the desired meeting:


A list appears, including information on when each participant joined and exited the meeting, how long they stayed in the meeting, and how much the Zoom window was frontmost on their screen:


Click the “Export” button to export this list to a file that saves in your computer’s “Downloads” folder. You can open this file in Excel.

Note: if you used breakout rooms during the session, each time each participant joined a breakout session or re-joined the main session that participant is listed again. You may have a list of triple the size of the actual number of participants, with each participant appearing three or more times. To limit this list to include each participant only once, select the checkbox for “Show unique users”:


This shortened list only includes the total duration that each participant was in the meeting, but you have a list of all those who attended!

Monday, March 30, 2020

Create and Launch Poll During a Zoom Meeting

Instructors may want to poll their students in order to generate or facilitate an activity or discussion in class. For example:

How great is the difference between the educational system in your home country and the U.S. educational system?

  • Extremely different
  • Somewhat different
  • Slightly different
  • Not at all different


Instructors can view the results come in as the poll is conducted. Then, they have the option of sharing the results with the class.

Follow these steps to create and launch a poll during a meeting:

1. Click the Polls (Polling) icon in toolbar.

Arrow pointing to "Polls" menu


A Polls window will pop up.
2. Click Add a Question button.

Pop-up window for the polls to add in questions


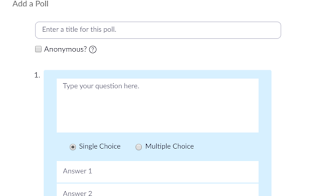
3. Fill out the information in the "Add a Poll" window (title, question, answers, add more questions)

Information window for the polls


4. Click Save.

5. Return to your meeting. The Polls window will still be open. If it is closed, click the Polls (Polling) button to reopen it.

6. Click "Launch Poll" or "Launch Polling"  button to open the poll for the students.

"Launch Poll" button


In upcoming Tips of the Day, we will explore how to create a poll ahead of time, as well as explore how to edit polls, navigate multiple polls in a meeting, etc. Stay tuned. . .


Friday, March 27, 2020

Change how you appear in Zoom

Today we have a two-for-one tip having to do with how your participant screen window appears in Zoom. The first has to do with how you can change the name that appears in your window, and the second deals with providing an image that appears in your participant window when you mute the video camera.

I. Temporarily change the name that appears in your participant window.


Each participant window in Zoom displays the name of the participant, whether the host of the meeting or the attendees. The name that appears is also the name that is listed in the “Participants” pallet that appears when you click the “Manage Participants” or the “Participants” button. You can temporarily change the name that refers to you in both places. This change only persists for the current meeting session.

Here’s how:

Open the participants’ pallet by clicking on the “Manage Participants” button in the menu bar at the bottom of the Zoom screen:

"Manage Participants" button highlighted

Hover over your name in the list of participants:

Name of a participant


Two buttons appear on the line with your name. The one on the right is labeled “Rename.”

Click the “Rename” button. A window appears asking you to enter a new name:

Pop-up window to rename name


Enter your preferred name and click “Rename”:

"Rename" button highlighted


Your preferred name replaces the old one in the Participant list and at the bottom left of your participant window:

Name of the participant

This change is only in effect within the current meeting. Once you exit the meeting, your Participant name reverts to the default.

II. Include an image in the participant list and in your Participant window.

By default, when you mute the camera in Zoom, a static black background appears in your participant screen window, with your participant name presented in white:


You can include a photo of yourself or any image to identify yourself within this black background. Selfies work great. Or you can use an avatar of some sort. We have chosen a photo from pixelbay.com for our image.

Here’s how:

In your browser, go to zoom.umn.edu and click on the “Log In” button:

"Log-in" button


Click the “Profile” menu item in the list at the left of the screen to bring up your personal settings:

Arrow pointing to "Profile" menu

In the top panel, you see an icon of a person. Click the “Change” link underneath this icon:

Arrow pointing to "Change"


 The window that pops up will allow you to replace the icon with an image. Click the “Upload” button to navigate to your computer files to locate an appropriate image.

"Upload" button highlighted


At left you see the image file you will upload, with a central portion selected. Inside the selection the image is bright, but outside the selection the image is darkened. The image at right displays the portion of the image at left that is selected and that will display.

Selection of image for profile picture


Drag the selection handles in the image at left to increase or decrease the portion of the image you want to display. You are restricted to a square selection:


When you have sized the selection, click the “Save” button at the bottom right of the window:

"Save" button highlighted


The image you uploaded replaces the icon on your Profile page...

Image of new profile picture


...and in the Participant list:

Participant list with new profile picture and name


… and in the static window shown when you mute your video camera:


This change persists from meeting to meeting. To change this image, repeat the process and choose a different image.

Thursday, March 26, 2020

Limit Share Screen Privileges in Zoom

Today's tip comes from Carter Griffith, instructor in the MELP program and member of the Language Center staff.

In light of recent increase in “Zoombombing”, random people entering and disrupting random meetings, instructors may want to limit who has the ability to share their screen in the meeting.

Here is a way to ensure that only the host can use Screen Share:

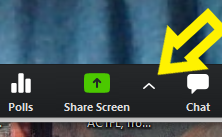
1. While hosting a meeting, click and hold the carat next to the “Share Screen” button at the bottom of the Zoom window:


Arrow pointing to carat next to "Share Screen"


2. Select “Advanced Sharing Options

Arrow pointing to "Advanced Sharing Options"

3. Select “Only Host” from “Who can share?” options and close the "Advanced Sharing Options" window:


This setting can be quickly toggled back and forth, if for example, an instructor wanted to briefly allow students to share their screens.

For more information on Zoom bombing and what you can do about it, see the document produced by LATIS to Protect your Zoom session with these best practices.

Wednesday, March 25, 2020

Share a video with sound in Zoom

Sometimes you want to show a video or play a sound file to the class. By default, Zoom does not share audio from your computer. However, you can enable the sound play-through from your computer in Zoom, so the attendees can hear as you play the video or sound file. There are two ways. One is to share the video within a window, such as a browser or media player. The other is to share the video at full screen. Here’s how:

First, locate the video that you want to play. This could be in a browser or in a media player, such as QuickTime or Media Player.  Make sure the video screen is visible on your own screen.

I. Playing a video within a window

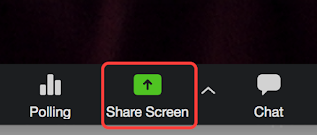
1. In Zoom, hover over the Zoom window and click the “Share screen” button that is visible at the bottom center of the Zoom window:

"Share screen" button highlighted

2. Select the window that contains the video.

Selection of window to share screen


3. At the bottom of the Share Screen window, check the box for “Share computer sound”:

"Share computer sound" click box

4. Click the “Share” button at the bottom of the Share Screen window:

Share button

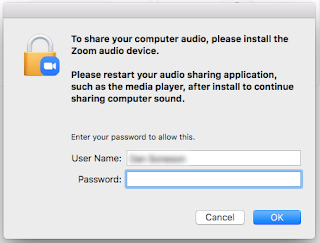
If this is the first time you attempt to “Share computer sound,” a window will pop up to indicate that you need to install the Zoom audio device. This is what it looks like on a Macintosh. On windows the window will look similar:

Pop-up window to install Zoom audio device

5. Enter your password to authenticate and click “OK” to install the “Zoom audio device.” You only need to do this step the first time you share the audio on your computer.

If you do not have privileges to manage your own computer, see below.

You are now sharing the window with the video content.

6. Play the video. Students should now be able to see and hear the video.

II. Playing a video full screen. 

1. To play a video full screen, you can choose to share the entire Desktop in the “Share Screen” window:

Selection of desktop to share screen

2. Check both boxes at the bottom left of this window:

"Share computer sound" and "Optimize for full-screen video clip" boxes checked


3. Click the “Share” button at bottom right of the Share Screen window:

"Share" button


You are now sharing your entire Desktop.

4. In YouTube, click the “Full Screen” button at the bottom right of the video window:

"Full screen" button highlighted


You are now sharing the video with audio full screen.


Note 1: Remember to uncheck both checkboxes in the Share Screen window if you are not sharing your computer’s audio. You can always check it again each time you wish to share your computer’s audio.

Note 2: If you cannot install the Zoom audio device, you can either upload the video file to Kaltura and link to it in Canvas, or link to a YouTube video in Canvas, and ask the students to watch the video on their own device.

Note 3: Please consider attending the training session this Friday, March 27, at 10 am  on using Kaltura for recording lectures and for creating interactive comprehension checks with video in Kaltura.

Tuesday, March 24, 2020

Share a portion of your screen in Zoom

Yesterday we showed how to run a Google presentation with Google Presenter to share only the presentation slides while you still have access to notes. Today, we will show how this works in PowerPoint by sharing only a portion of your screen. This will allow you to show only the slides to your students while you can still see your notes. Here’s how:

First, make sure your Zoom meeting is running. Then navigate to PowerPoint to open your presentation.

1. Open your presentation file in PowerPoint.
2. Among the tabs at the top of the PowerPoint window, select “Slide Show”

"Slide Show" tab highlighted


ON A MACINTOSH COMPUTER:

3. With the “Slide Show” ribbon open, click on “Presenter view” to open the full-screen controls:

"Presenter view" button highlighted


ON A WINDOWS COMPUTER

3. With the Slide Show ribbon open, click and hold the “Presenter view” checkbox toward the middle of the ribbon. A message box will open:


You are instructed to press ALT+F5 to bring up the presenter view screen.

3.a. Hold down the Alt key and press the F5 key at the top of your keyboard.

A screen like the following will appear (different colors are possible, depending on your computer platform):

Presentation view example


4. Return to your Zoom meeting.
5. In Zoom, hover over the Zoom window and click the “Share Screen” button at the bottom center:

"Share Screen" button highlighted

At the top of the “Share” window, select the “Advanced” tab:

"Advanced" tab highlighted

Select “Portion of Screen” at the left of the “Advanced” screen:

"Portion of Screen" button highlighted


6. Click “Share” at the bottom right of the window:
"Share" button


7. Navigate to the PowerPoint application. The Presenter View window should still be on screen.

8. Drag the green border around the portion of the screen you want to share. The color changes to orange as you change the size. Select only the PowerPoint slide area at the top left:

Selection of Power Point slide for share screening


Once the slide portion is selected, the border turns green. Zoom will share only what is within the green border. You can see and use this interface to see your notes at the bottom right and navigate among slides.

Screen sharing with presenter view example


You can use this “Advanced” Sharing method to select any portion of your screen that is visible, without sharing an entire window or your entire screen.

Monday, March 23, 2020

Run a Google Presentation in Zoom with access to your notes

You can run a Google presentation from a second window, allowing students to see only  the presentation screen in zoom, while you still have full access to your notes. Here’s how:


1. Open your presentation in the Browser.
2. Click on the arrow button on the right side of the “Present” button:
Highlighted arrow button

3. A short menu drops down. Select “Presenter view”

Menu with "presenter view" option


4. A new window opens containing the controls for the presentation:


Presentation controls


The presentation is now running in the browser window:

Presentation in a browser window


5. In zoom, click the “Share Screen” button to bring up the Share window:

"Share Screen" button highlighted


6. Select the browser window that contains the presentation:

Selection of window to screen share


6. Click the  "Share" button at the bottom right to share only the browser window. ,

Only this browser window will be shared, and you can run the presentation form the “Presenter view” window, complete with your notes.