Thursday, April 30, 2020

Allow Students to Share Screen in Zoom

It is often useful for an instructor to share their screen in zoom. In many ways it can be used like a projector is used in an on-site classroom. Instructors also have the option of allowing students to share their own screens with the group. Here’s how:

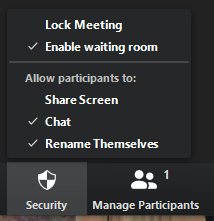
1. Click “security” on the toolbar.

2. Check “Share Screen” under the “Allow participants to:” options.


3. Students then click “Share Screen” on their own toolbar to share with the group.

Zoom toolbar menu


Students will have the same screen-sharing ability within a breakout room as well.

This feature can be useful for having students do informal, practice presentations with their classmates, or for conducting a poster session where students are circulated from breakout room to breakout room, or perhaps simply for show-and-tell!

Wednesday, April 29, 2020

Sharing Suggestions for Wrapping Up the Semester Virtually

As the end of the semester quickly approaches, our team at the language center would like to ask for suggestions on how to celebrate the end of the semester virtually. Instructors often like to do some sort of fun, informal activity as a send-off to students, or simply as a way to celebrate the semester.

Some suggestions from the LC team:
  • Create a screenshot of the gallery view of the class in Zoom and have students sign their picture, like a yearbook. 
  • Create a flipgrid where students share their thoughts on the semester. 
  • Play a Minnesota-themed game of charades or Pictionary. 
If you have any suggestions, please share! We would love to hear from you and to share your ideas in upcoming Tips of the Day! Please contact us at grif0050@umn.edu with your ideas. Thank you!

Tuesday, April 28, 2020

Live Transcript feature in Zoom

The host of a zoom meeting can activate automatic live transcription. Currently, the auto transcription is only possible in standard English. Despite that limitation, instructors can use it to view and document any participant speaking in class in standard English. ESL instructors and hosts with meeting participants who are hard of hearing may find this feature particularly useful. A special "thank you" goes to ESL instructor Eric Nelson for inspiring this tip.

1. During a meeting, click on “Live Transcript” on the toolbar.

"Live Transcript" button highlighted


2. Next, click on “Enable Auto-transcription”.

Arrow pointing to "Enable Auto-transcription"


3. As people speak, the live transcript will appear near the bottom of the video feed. Each caption will disappear after a few seconds.

Live transcript appearing


4. In order to see the full written transcript, click the carat next to “Live Transcript”. In the resulting menu, select “View Full Transcript”.


5. The full transcript will appear in a window on the right (where the chat window is normally found).

Full transcript


While the accuracy of the transcripts is certainly not perfect, this feature can be useful in providing written documentation of the meeting.

For those teaching English as a second language, the transcription might be a handy check on pronunciation and provide a way for students to compare their speech with how it is perceived by Zoom.

Monday, April 27, 2020

Have Students Submit a Photo of a Written Assignment in Canvas

In some cases instructors may wish to see a hand-written copy of an assignment (as opposed to .doc, or .pdf, etc. formats). Canvas allows instructors to require that the format of the submission is a photo file (.png or .jpg in this case).

1. Create a new assignment in Canvas.


2. Scroll down to “Online Entry Options” under “Submission Type”. Select “File Uploads” and then “Restrict Upload File Types”. Enter the appropriate type(s) of files, again png and jpg in this case.


3. Click “Save” or “Save and Publish”, and you’re ready to receive photos of written assignments! Caveat: this process assumes that students are able to take a photo and save it in the desired format. That could certainly be demonstrated in class if need be.

Friday, April 24, 2020

Some applications for a Whiteboard

I must admit, I have never been a huge fan of virtual whiteboards, always assuming they were more trouble than they were worth, especially if we want our students to participate collaboratively in a whiteboard activity.

However, in the current stage of alternate instruction, in which we are conducting classes synchronously at a distance, the virtual whiteboard has become quite attractive, especially if we can customize the layout and provide organized and scaffolded activities for students to complete, either individually or synchronously in small groups.

This week we focus on creating a virtual whiteboard in Google Slides and provide a few examples of what you might have students do in this environment. What follows are more suggestions for whiteboard activities, supplied by Kate Paesani:

Jigsaw Activity

  • Divide a text or topic into segments (e.g., by paragraph; based on characters from a novel; etc.)
  • Group students together and have them list as much information as they can about their assigned topic/text segment (e.g., Group 1 works on paragraph 1; Group 2 on paragraph 2: etc.)
  • Regroup students with one member from each of the original groups; each person then shares the whiteboard from their expert group
  • After each person presents its assigned topic/segment, the group decides which idea from each topic/segment is most important and puts that on a new whiteboard to present to the entire class


Brainstorming / Identification of Key Terms

  • Create a different whiteboard for each key concept (e.g., interpersonal, presentational, interpretive communication)
  • Have one group of students work with a whiteboard and brainstorm as many ideas as they can about the concept
  • Groups move on to the next whiteboard and they identify the 5 most important ideas from the initial brainstorm (they can put these in a different part of the slide or highlight them in a different color)
  • Groups move again and identify the 3 most important ideas from the 5 identified in the previous activity (again, they can move these to a different part of the slide or highlight in yet another color); that group then presents the concept to the rest of the class, explaining why the 3 ideas are the most appropriate for defining the concept
  • This activity could be used with lower-level language learners to build vocabulary lists and circumlocution skills


What other uses can you envision for using whiteboards in your classes?

Thursday, April 23, 2020

Create a whiteboard template with multiple copies

Yesterday we showed how to use an image as a static background in a Google Slide file. Today we show how to make modifications to a slide with a similar image and create a background from the result, as well as how to create a slide for each student or group of students within the same file.

Open a new slide file in Google slides and arrange the dimensions of the slide (see tip on resizing the screen in Slides).

Import the image that will serve as the base of the background:


Comic strip

Add elements that will appear on every slide. You may want to resize the image on the screen as well:


Once you have the slide the way you want it, make a picture out of the slide. The easiest way is to download a JPEG or PNG file of the screen. Select File > Download > PNG image (.png, current slide) or File > Download > JPEG image (.jpg, current slide):


Now you have an image that you can import as a background (see yesterday’s tip). Add text boxes on top of this background that will be on every slide:

Inserting text boxes to the slide

Once you have made the background, you can make a slide for each student or group of students by duplicating the original slide. There are two ways to do this.

Select Duplicate Slide from the Slide menu:


Select the slide in the left side bar, hold down the Cmd key (Mac) or the Ctrl key (Windows) and press d to duplicate the slide. You can quickly make as many copies as you need for your class.

Students can work together or independently on their own slide, either simultaneously or asynchronously, and all the versions are saved in one file.


Wednesday, April 22, 2020

Annotate a Comic Strip in Google Slides

Building on the idea of creating a whiteboard in google slides, today’s tip describes how to make a comic strip the background for a google slide. Instructors can then have students annotate their own copy of the comic strip by adding dialogue and/or narration.

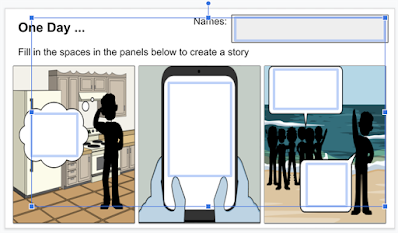
1. Using a custom comic strip creator (like this one, for example), create your own three panel comic strip. Using a screen shot, save an image of the comic strip as a .PNG file. The following was created for this demonstration.

Example comic strip

2. Create a google slides presentation.

3. Click “Background”.

Arrow pointing to "Background"


4. Click “Choose Image”. Once image is selected, click “Done”.

Arrow pointing to "Choose Image"


The image is now the background of the slide, which is not affected in any way by editing the slide.

Comic strip inserted as background


5. Insert text boxes where dialogue and or narration are desired.

Selection of "Text box"


Here is the first of four text boxes for this slide:

Text box inserted on the slide


Share the "whiteboard" with your students by having them make a copy of the file (See this tip).

Now each student or group of students will be able to provide their own text in the boxes.


Tuesday, April 21, 2020

Set an Image as Background and Annotation in Google Slides

Today’s tip builds on a previous tip on how to annotate a shared screen in zoom. Google slides offers more annotation features than working directly in zoom. Today we will see how to create a “locked” background on a slide, meaning any content in the background can not be manipulated when editing the slide. We will then see how instructors can annotate a slide, and how instructors can give students access to their own copy of the original slide to annotate themselves, either in class or as homework.

1. Create a presentation in google slides.

2. For this exercise, we are going to use a PNG file of text as the background, seen below. Create or find an image for the background. 


Text image for background


Again, putting the text as a background image means that it can not be altered during editing of the slide.

3. Click “background” on the toolbar in google slides.       


Arrow pointing to "background"


4. Click “Choose Image”. 


5. Click “Browse” to select an image from your files. 


6.Once the image file is selected, click “Done”. 


The slide will now have the selected image as a background.

7. By using, for example, the “Shape” and “Line” buttons, annotations can be made to the slide. 


In order to make a copy available to all students that they can annotate independently without changing the instructor’s original, consult this previous tip of the day.

The background could be set as a landscape photo, a restaurant menu, a maze, or whatever best fits the instructor’s purposes for that lesson!

Monday, April 20, 2020

Create your own Whiteboard in Google Slides

Both Zoom and Canvas come with a whiteboard option that can be useful for creating presentations and limited interactions. Google Slides allows you to create and prepare your own interactive whiteboard. The resulting whiteboard can be shared with your students, and they can have their own copy to use, either alone or shared with others in small groups.

Here’s how:

Open a new Google Presentation, and give it a name
Under the File menu, choose “Page Setup”


Here you can choose a dimension or set a specific custom size.


If you select Custom, you are prompted to enter the custom size.

Enter the specific size you want and click Apply:


For a blank white background, either select and delete the text boxes or click the Layout button and select the last option in the drop-down window:  Blank.


You now have a custom-sized tabula rasa that you can share. You can then use the text and drawing tools in the toolbar to add elements to the whiteboard:

Text and and drawing tools available to use


For each student to have their own copy of the whiteboard, follow the tip on sharing copies of Google docs.

Check back for tips on how to customize your whiteboard.

Friday, April 17, 2020

Mix it up: Add Movement to your Breakout Rooms in Zoom

Breakout Rooms: it’s the best Zoom tool for getting students talking in small groups.

You have a few choices on how to start Breakroom Rooms:
  • Preassign your rooms or do it in the meeting (see this helpful video on how to preassign)
  • Automatic or manual
  • Decide how many students per room
Looking for more options? You can experiment with letting some or all students float from room to room. This might be helpful if there are multiple discussions or presentations going on simultaneously, if you have some students serving in a TA-type role, or just to mix up class for a few minutes.

Only the meeting Host can start a Breakout Room, but once the meeting is underway, the Host can assign one or more Co-Hosts. A Co-Host cannot start a Breakout Room, but once assigned to a room, can move from room to room, just like how the Host can move from room to room. Please review the Roles in a Meeting Grid for important information about the difference between a Host and Co-Host. Be aware that Co-Hosts are granted powerful security roles, including the ability to remove regular Participants from the meeting.

In order to allow all students to migrate from room to room, you would need to make them all Co-Hosts. Is this a little dangerous? Yes it is, but if you still want to mix it up, here’s what to do:
  • Talk to your students first and set guidelines for the activity
  • Follow one of the two methods of assigning a Co-Host in a meeting
  • Launch your Breakout Rooms
  • Add the Co-hosts to the Breakout Rooms
  • Keep an eye on your Breakout Rooms to make sure that the activity is going well
Wish is were possible to allow students to change Breakout Rooms without making them Co-Hosts? Zoom is working on this feature, but is not yet available.

Thursday, April 16, 2020

Annotate Shared Screen

While in Screen Share mode, instructors are able to Annotate the score by adding shapes, text, and other visual effects. This could be used to move “pieces” around during a board game, add written information to an image or a PDF as it is elicited from students, etc.

1. During a meeting, click “Screen Share” on the bottom toolbar and select the document or window that you wish to share and annotate.

Toolbar menu


2. Hover the cursor over the green bar at the top.


3. Click “Annotate”.


Toolbar menu highlighting "Annotate" button


4. Choose from the various options to add visual effects to your shared screen. . .


Annotating toolbar


For example, instructors can add one or more of six simple shapes with “Stamp” (stars), add other shapes or draw lines using “Draw” (red lines), seen below. “Text” and “Spotlight” are also useful tools in adding information to a shred screen.


Example using the annotating tools


The Annotate function gives instructors possibilities beyond sharing a static image or an existing video. They can make simple, custom additions as they see appropriate. Tips on more involved ways to manipulate images interactively with students are on the way!

Wednesday, April 15, 2020

Show or hide the Zoom meeting controls

The meeting controls in a Zoom meeting are located in a black bar at the bottom of the Zoom window. This bar can appear when the mouse cursor is anywhere over the Zoom window, and it disappears seconds after the mouse leaves the window:

Zoom toolbar


You may want to have this control bar static and visible at all times. Here’s how.

There is a toggle checkbox in the Zoom settings screen in the Zoom application. This settings window is different from the general settings screen on the Zoom website. It allows you to set preferences for session audio or video, among other things:

General settings screen on Zoom


There are several ways to access this window. To do so easily from within the Zoom meeting, hold down the carat by either the video or audio button at the left of the control bar and select the last item in the pop-up menu:


The settings window opens to the video or audio settings screen. Select “Accessibility,” the last menu item in the list at the left.

“Accessibility” settings screen


Here you can set the size of subtitles for audio transcription or the size of the text in the Chat. You can also toggle the meeting controls to be always on or not. Select the checkbox for “Always show meeting controls” to keep the control bar visible at all times.

“Always show meeting controls” box checked


De-select this checkbox to allow the control bar to disappear and reappear, depending on the position of your mouse cursor.

Explore some of the other settings in this window to see how you can customize your Zoom meetings.

Tuesday, April 14, 2020

Save and access the Zoom chat transcript

Often there is important information that is conveyed in a chat in Zoom. You can save the text of the chat to access this information later. Zoom can automatically save the text of the chat from each meeting that you host so that you don’t have to remember to do so each time. Here’s how you set it up.

1. Log in to zoom.umn.edu

2. Click the Settings button in the menu at left and then the link to “In Meeting (Basic):


3. Scroll just a bit until you see the toggle for “Auto saving chats” and make sure the toggle switch is on:

“Auto saving chats” button checked


Now whenever you close a meeting, the chat is saved automatically. Zoom creates a plain text file with the text of the chat, including the time of each entry, the name of the contributor, and the text:

Example of saved chats

But where is it saved? How do you find this text file? 

By default, Zoom creates a “Zoom” folder within the Documents folder of your computer. For each session, Zoom creates a sub-folder within this folder and places the text file of the chat into it. This is also the folder into which Zoom places the recorded video of the meeting if you elect to record the meeting and save the video to your computer.

Open your Documents folder, locate and open the Zoom folder. The folder for each session is labeled with the date and time of the session and the name of the meeting. The text file containing the chat is located within this folder.

Here is what it looks like on a Mac:

Zoom chats saved in documents on a Mac


And it looks like this in Windows:

Zoom chats saved in Windows


You now have a record of the conversation that took place within the chat of your meeting.

You can open this file now in a text editor or even in Excel.


Monday, April 13, 2020

New Zoom Security Button in Recent Update

In a recent update during the week of April 6, Zoom has consolidated access to many security features in one place: a “Security” button in the host’s (and co-host’s) toolbar. This gives the (co-)host the ability to toggle various security features during a meeting.

1. Click the “Security” button on the toolbar.

Zoom toolbar

2. Security options will appear. Toggle them on/off as desired.

"Security" menu highlighted

If you check "Lock Meeting" no one can subsequently enter the meeting.

If you enable the waiting room, participants can still enter the meeting, but will need your approval to do so.

The CLA Language Center continues to monitor security updates available in Zoom. Keeping unwanted people and content out of remote classrooms is of the utmost importance.

Friday, April 10, 2020

Look Your Best on Camera with Zoom

Your appearance in your online sessions is important: proper lighting helps set the tone and highlight your face; the colors and patterns you wear can either serve to separate you from the background or be visually distracting, and poor lighting or a distracting background can convey a very different message to your audience than you intend. Who knows how long we will need to remain online during the current upheaval? – and those hours will add up! Thankfully, taking the time to alter your at-home workspace with simple techniques can greatly improve your Zoom appearance for the long haul.

In Zoom’s WordPress Blog, it is recommended that you use lighting to indirectly light your face from a front-facing angle, “use a relatively weak light source so you don’t end up looking washed out, and position it towards your face from the front. Avoid pointing the light source directly at your eyes. Instead, position it in such a way that it sits above you and points just above your head. You do not want the majority of the light to hit you, but you want just enough to make your face a bit more brilliant on-screen.”

Lighting your Zoom Image


Poor Lighting


Natural Lighting


Lighting with front-facing indirect light.

Note the light source used in the example is stronger than the ideal light source. Make do with what you have available.


Suggestions for Optimal Lighting

Aim for two light sources in front of you, evenly spaced, with light directed at about a 45-degree angle from you. Using lampshades can diffuse the light to soften the direct light and reduce “wash-out” in your image. Natural lighting from windows can help too!


Choosing a Background

Choose a background that is uncluttered, if possible. Ensure that there are no items in the background that are directly behind your body or head, such as a lamp, photo, or plant growing out of the side of your head!


Virtual Backgrounds

You might be sharing space at home with a spouse and kids, vying for the best spot, lighting, and equipment, or maybe you just prefer to not broadcast your home publicly. Did you know you can choose your own virtual background?

This is a great option for those who have a powerful enough processor in their computer. Zoom provides the option of choosing an image or video (your own landscape photos, for example) as your background image, acting as an image against a green screen. This requires a great deal of processing power, visit Zoom’s support page to find out whether your PC of Mac’s CPU can run a virtual background. Here’s how it works.

1. Select zoom.usPreferences


2. Select Virtual Background from the drop-down list. Click on the image of the background you would like to use from the tiles – Zoom provides a few backgrounds for free.


3. You can upload your own images (JPG, PNG) by clicking the [+] button …


4. … and choosing an image from your computer’s files.


Choosing the right virtual background will come down to your preference. You might have a photo from a family trip that shows off a beautiful landscape. On the other hand, you can have fun with virtual backgrounds too! Google has many images available for re-use.


Have fun with it!


Clothing Color and Patterns

Clothing choice is an obvious first step for improving your online image – however, it goes beyond choosing business casual over pajamas. You’ll want to consider the patterns of your clothing as well as the color. Consider the colors and business of your background, and then choose your clothing appropriately.


Avoid: Busy clothing patterns like in the image below, clothing that is too dark (black), and clothing that is too light (white). 


Wear: Earth tones, pastel colors, and simple patterns or single colors will show up best on camera, be the least distracting, and help distinguish you from your background.


“Touch up my appearance” and Mirroring your Video


Finally, one of the simplest ways to improve your personal Image on Zoom is to use the feature “Touch up Your Appearance”:


"Touch up my appearance" is an option that essentially softens the image of the video, effectively smoothing out facial blemishes. "Mirror my Video" flips the orientation of your video, such that if you raise your right hand, your hand will be on the right-hand side of the screen. This makes your video playback appear less disorienting. Play around with these settings to determine your preference.


Here is an image with “Touch up my appearance” off:


Here is an image with it on:


Play around with your image environment – not all features may be available to you – make the most of what you have! 

We hope these suggestions help raise your level of comfort in how you appear to your students in live video conferencing.