Take advantage of a Zoom feature designed for online office hours: the Waiting Room.
The Waiting Room allows you as the host to control when a participant joins the meeting. You enable the Waiting Room when you schedule the meeting. Here are the key settings when you schedule the meeting:
Use the Topic field (the very first field), and put all key information in the Topic. It’s okay to use a lot of characters. The Topic is what your students will see while they wait. They will not see information from your Description field.
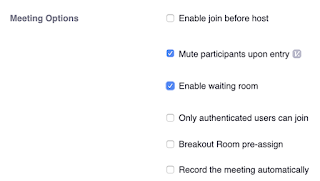
Under Meeting Options select "Enable waiting room." Also, make sure "Enable join before host" is unselected:
The only difference between a meeting with a Waiting Room and a regular meeting is how students enter – which is that you admit them when you are ready. You can allow one to join the meeting at a time, or fill your meeting with everyone who had been waiting.
Here is what participants see while they wait for you to admit them. The second line is the Meeting Topic.
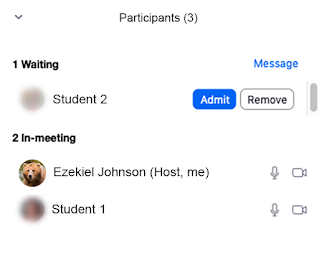
And here is what it looks like as the host to be meeting with one student and have another in the Waiting Room. It’s easy to admit students that are waiting:
Waiting Rooms make office hours simple for your and your students.


No comments:
Post a Comment